Kubernetes Overview
In the last chapter, we built a Docker image of a simple HTTP server and ran it as a container. We are now ready to enter the world of Kubernetes and see how we can run the same server inside Kubernetes.
In a Kubernetes cluster, a “Pod” is the smallest unit that can be deployed and run. It is essentially a container or a group of containers. We will learn more about Pods and why they support group of containers in later sections but for now, it is sufficient to understand that a container is wrapped in a “Pod” to be run in a Kubernetes cluster.
Before we take a deep dive into Kubernetes concepts, let us try to understand what exactly is a “Kubernetes cluster”. The following diagram shows Kubernetes components at a very high level.
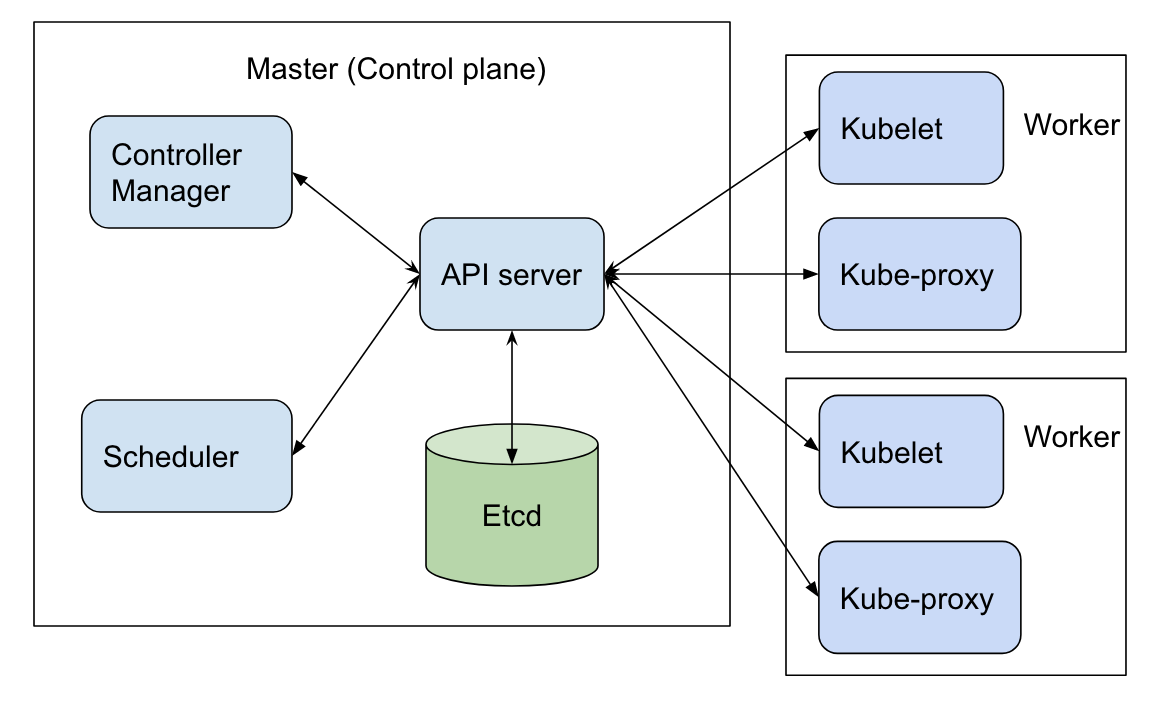
A very concise overview of the architecture:
- Kubernetes is a cluster solution in that it manages multiple nodes and can seamlessly run pods on any node.
- There is a master node that runs the components that “manage” the cluster. These components are typically referred to as “control plane” of the cluster. Note that it is possible to have more than one master if you want to create highly available clusters but for our discussion, we will assume there is a single master node.
- The remaining nodes are ‘worker” nodes that run pods. The cluster components that run on the worker nodes are referred to as “Node components”.
Typically, master node is dedicated to running control plane components and workloads are not run there. But you can easily change that and if you are using a one node cluster, you obviously need to do that.
Here is a brief description of each component in a Kubernetes cluster. We will learn more details about them in the coming chapters.
- API server
- API server is the front end to the cluster. It implements the Kubernetes REST API. An important point is that the APIs are used not only by external components but internal components as well (though they may use a slightly different format of the API).
- Etcd
- Etcd is a distributed key-value store and is used by API server to persist all resources.
- Scheduler
- Decides which node should run a newly created pod.
- Controller Manager
- Comprises of several different “controllers” that manage Kubernetes resources such as nodes, pods, service accounts etc.
- Kubelet
- Runs on each node and makes sure that pods are running containers as per the spec.
- kube-proxy
- Runs on each node. It implements the network semantics for the cluster by forwarding traffic from one node to the other.
Now that we have a high level understanding of what Kubernetes is, we need a test environment where you can run the commands and see the cluster in action. There are many options when it comes to setting up a test Kubernetes cluster. The easiest perhaps is to use Katacoda but my personal preference is to install minikube locally.
Minikube
Minikube creates a one node cluster that is very handy to test things locally. It can install cluster components in several different ways.
- Directly on the host itself
- Using Docker
- Using VirtualBox VM
The recommended way is to use “Docker”, like so:
$ minikube start --vm-driver docker
Kubectl
To access the cluster we just created, we need kubectl which is a command line tool to manage and control Kubernetes clusters. If you work with Kubernetes actively, you will be spending lot of time running this command so it is very important and useful to master it.
Using kubectl, you can perform CRUD actions on all Kubernetes
resources. After installing minikube and kubectl, run the following
command to verify that the test setup is working:
$ kubectl -n kube-system get pod

NAME                           READY   STATUS    RESTARTS   AGE
coredns-66bff467f8-mdr29       1/1     Running   0          5d19h
coredns-66bff467f8-rrxxd       1/1     Running   0          5d19h
etcd-test                      1/1     Running   0          5d19h
kindnet-lnmg9                  1/1     Running   0          5d19h
kube-apiserver-test            1/1     Running   0          5d19h
kube-controller-manager-test   1/1     Running   0          5d19h
kube-proxy-wp5pm               1/1     Running   0          5d19h
kube-scheduler-test            1/1     Running   0          5d19h
storage-provisioner            1/1     Running   0          5d19h
The command shows all the running pods in the namespace “kube-system” (more about namespaces later). You can see some of the components we discussed earlier such as etcd and apiserver in the listing above.
Running the HTTP Server
We are now ready to run our basic HTTP server in a Kubernetes cluster.
First, we need to add the Docker image of our basic server (which we built in the last chapter) to minikube cluster we just created:
$ minikube cache add basicserver:0.42
This step is only necessary for local images. If the image is available in Docker Hub or in some other Docker registry, we don’t need to explicitly add the image to the cache.
Let us now run the server:
$ kubectl run --image basicserver:0.42 testpod
pod/testpod created

$ kubectl get pod
NAME      READY   STATUS    RESTARTS   AGE
testpod   1/1     Running   0          4s
We can see that the HTTP server pod is running. However, even though the server is running, it is not reachable from outside the cluster yet. One simple way to fix this is to have “kubectl” forward traffic from a port on the localhost to the server inside the cluster, like so:
$ kubectl port-forward testpod 5000:5000
Forwarding from 127.0.0.1:5000 -> 5000
Forwarding from [::1]:5000 -> 5000
Once this forwarding is set up, we can reach the HTTP server from localhost. We can easily verify that using the same curl command we used in the previous chapter.
$ curl http://localhost:5000
Hello, World!
That’s it! We now managed to run our server in three different environments - on the host directly, as a Docker container, and finally in a Kubernetes cluster. But do note that the above commands were only meant to get a pod up and running for some quick testing. They are not the recommended way to create resources in a Kubernetes cluster.
In the next chapter, we will learn all about pods and some other abstractions that work with pods. In the process, we will also learn some general concepts about Kubernetes resources and the recommended way of creating and otherwise managing such resources.
More content is coming soon. Stay tuned!